Week 1: The Basics of Three Point Lighting and Portrait Lighting
Day 1: WHITE BALANCE AND Light Temperature
Kelvin and light temperature
Pre-requisite: Completed pages made for new portfolio.
Reading: (take notes!)
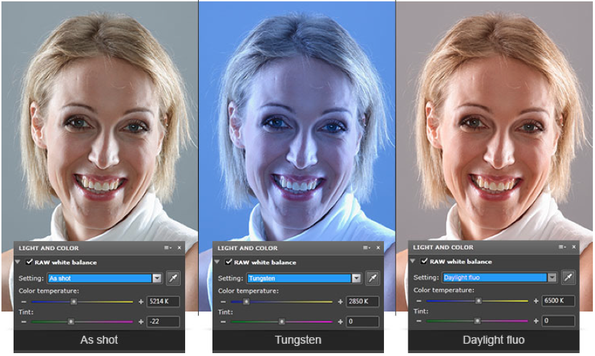
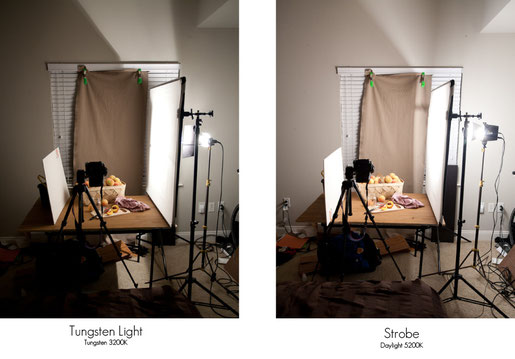
Did you know that not all lights are the same color? Or the same temperature? When we discuss light color in filmmaking we refer to the temperature of the light, which is expressed in kelvin. Kelvin is expressed by the symbol "K", a unit of measure for temperature based on the kelvin scale. Color temperatures over 5000 K are called cool colors (a blueish/white), or are referred to as daylight when talking about lighting. Lower color temperatures, around 2700-3000 K, are warm colors (a yellowish/golden) and are referred to as tungsten in the context of lighting.
Making All of Your Sources the Same Color (Advanced Use and Understanding White Balance)
Let's assume for the moment that you are using tungsten light. Your lights are 3200K, and the room lights are either 2500-3200K, if they're tungsten. If they're fluorescent they're 3500K for warm white, 4500K for cool white or 6500K for daylight balanced.
Kelvin represents just the red-blue spectrum of color temperature. Most fluorescents have a degree of green to contend with: up to 30 points. Throw your window light into the mix and you have three disparate light sources which you can't white-balance away. A large film production crew would gel the windows and overheads or sleeve the fluorescents to match your lights, but I'm guessing that's not in your budget, either time-wise or financially.
Plan B is to just turn the overheads off or at least disable the lamps in the immediate area around your set. Then you've only got the windows to deal with. Mid-to-late-afternoon sun will probably come in close to 3200K, but I'd have some sheets of (1/8th blue) or (1/4 blue) on hand to put on your lights, just in case. For strong blue north window light, pack some (1/2 blue) or (full blue) which will raise the color temperatures of your lights from 3200K to 4100K and 5500K respectively, to match the incoming window light. Then you can read for white balance. It's not written in stone. It just has to look good. Of course, you can eliminate this entire step by shooting at night, or in a windowless area.
I haven't listed filtration to match the various temperatures of overhead fluorescents because I'd rather exhaust every other possibility first, but you'll probably be adding "Plus green" (approx. 30 points of green) for 3200K lamps.
It's a bit confusing, but the concept isn't: make all your light sources the same color before white balancing. Remember, these gels are added to your light sources to match them to the ambient source.
ADD LYNDA LINK ABOUT WHITE BALANCE AND DIFFERENT COLORED LIGHTS
DAY 2 & 3: the basics of three point lighting

Pre-requisite: Completed pages made for new portfolio.
Great Page about interview Lighting
Reading: (take notes!)
Three point lighting setups consist of three main lights: the key light, the fill light, and the back light, or sometimes called the "hair light".
The key light is the first light that is placed in the set up, the purpose of the light being to light the character fully, usually from slightly above or higher above the subject. The key light is usually the brightest light of the three in the setup.
The fill light is the second light that is placed in the set up, the purpose of the light being to fill in the extra space that the key light does not hit, getting rid of any unwanted shadows created by the height of the key. A fill light can be made with any light of the same temperature, or more commonly can be made by reflecting a light off a bounce if you want a softer fill (for things such as interviews, or narrative scenes where the characters are stagnant). The fill light is usually the softest light of the three in the setup, but can vary between that and the back light.
The fill light also helps create a 2:1 ratio on your subject. The 2:1 ratio means the fill light (1) should be half as bright as the key light (2). This is a common lighting ratio for most films, but if you want a certain dramatic feel, or commercialized full brightness look, the ratios can vary.
Finally, the back light is the third light that is placed in the set up, the purpose of the light being to separate the subject from the background. The back light typically lights the subjects head and sometimes shoulders, creating a "halo effect" and creates a visible outline around the subject. A back light is placed anywhere behind the subject, up high shooting downward, on the ground shooting up, from the side at subject height, etc. The strength of the back light can drastically affect the dramatic feel of the scene.
Lynda:
Watch Chapters 1, 2 & 3 from Lynda about lighting
Take notes on all the videos and put notes in your portfolio
LINKS GO HERE
Project: The Three Point Lighting Setup
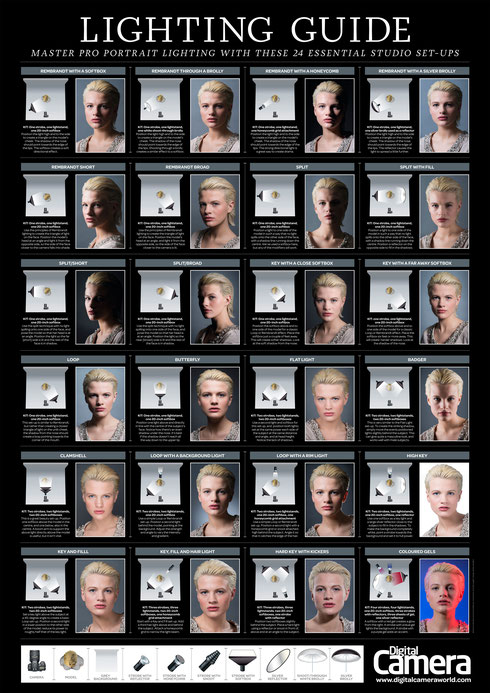
- Draw a lighting diagram (like the photo shown above) for a three point lighting setup of your choosing.
- Use the Gawlik Studio (or any basic room on campus) to create your setup. Light your subject and take a photo through the camera of the subject for the lighting results, and take photos with your phone of the overall setup from a wide angle.
- Upload all photos to your portfolio.
Reflection:
- What sort of questions should they answer?
day 3 & 4: interview lighting
Pre-requisite: Completed notes and project from "Temperature and Three Point Lighting"
Lynda:
- Watch "Lighting a Video Interview" on Lynda: LINK PARTS 1, 4, 7, 8, & 9
- Take notes on all the videos and put notes in your portfolio LINKS
Project: Interview Lighting:
- Draw a lighting diagram for an interview setup of your choosing
- Use the Gawlik Studio (or any basic room on campus) to create your setup. Light your subject and take a photo through the camera of the subject for the lighting results, and take photos with your phone of the overall setup from a wide angle
- Film a 1 minute interview with your subject. Think of new and unusual camera angles or ways to film it (from the side, two camera, handheld, etc.)
- Upload all photos and video to your portfolio
Reflection:
- What sort of questions should they answer?
day 5: critique and reflection
Get together with other people who are in the Cinema Studio class for a class-wide "Critique and Reflection" period. Each week on Fridays, your time will be reserved for critique, reflection, vocabulary quiz, and prep for next week's projects.
With each completed week, students shall complete a reflection of the project (your project based reflection questions, all due on Friday of that week) and present their work to the class for a group critique session. Critique sessions will be held every Friday. Critique and Reflection will help students not only understand their own work better, but also their peer’s. Seeing other student’s work in progress or as a finished product will help students understand ways that they could better their own work, find other students with similar styles to work with, find students who could assist you in getting better at one particular area of study, or seeing where you yourself would be able to help teach another student about a particular aspect of filmmaking.
HOW TO CRITIQUE: THE CRITIQUE SANDWICH
Positive Feedback (The Top Bun)
- Start off with a specific positive comment about the piece being critiqued. People won't listen to you if you immediately start off with negative comments.
- Example: "I really liked the dramatic shadows you created with the lighting on his/her face. It created a dark and mysterious feel for the character."
Constructive Criticism (The Meat)
- Next, provide a comment of constructive criticism about an aspect of the film. Whenever you provide constructive criticism, remember to always provide a "solution" to the problem you are addressing, meaning, don't just say "this is bad", but say "this wasn't great, this is a possible way to fix it."
- Example: "I felt like the red lighting was a bit to hard on the characters face. Perhaps next time it could be shot with some added diffusion to create a softer light, but still retain the scary/angry feel you were going for with the color?"
Pat On The Back (The Bottom Bun)
- Wrap it up on a good note: "nice job overall" or "I really enjoyed the entire concept of this film" will go a long way with making sure your criticism sticks and they will listen to you, instead of ignoring it.
- Example: "Overall, I LOVED the piece. The emotions you conveyed through the dramatic lighting really heightened the reality you were creating with the film."
weekly vocabulary Review & quiz
Key Light
Fill Light
Back Light/Hair Light
2:1 Ratio
Kelvin (K)
Tungsten
Daylight