Week 2: Product Lighting, Natural Lighting, and Low Light
Day 1 & 2: product lighting
Pre-requisite: Completion of Week 1 Reflections, Critique, Vocabulary Quiz, and Projects
Reading: (take notes!)
Read the following article about lighting products for photography and take avid notes. These will be essential to creating a lighting diagram for your next project.
https://www.shopify.com/blog/12206313-the-ultimate-diy-guide-to-beautiful-product-photography
Lynda:
Lighting For Product Photography
Project: Light a Product
- Bring in an object to use as your product. A can of hairspray, a backpack, a laptop, something unique that you could get a few different angles/shots of.
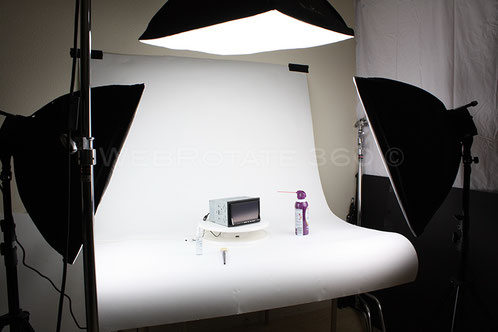
- Create a lighting diagram for lighting your product. Think of your background color, where you're going to shoot (Gawlik Studio, dark room, etc.) and what would be best to highlight the product, what sort of feel are you going for? (i.e. sleek, new, fun, etc.)
- Shoot a short 30 second commercial for said product, edit and upload to Vimeo. Take photos of your lighting set up with your phone and photos of the product through the camera.
- Upload all photos and final video to your portfolio.
Reflection:
- What sort of questions should they answer?
DAY 3 & 4: NATURAL LIGHTING and Bounces
TEXT AND SHIT

Pre-requisite: Completed notes and project from "Product Lighting"
Reading: (take notes!)
Read the following article about using bounces and natural light and take avid notes. These will be essential to creating a lighting diagram for your next project.
http://nofilmschool.com/2014/06/learn-reflectors-to-double-bounce-natural-light
Tips For Filming With Only Natural Lighting
MAKE THE SUN YOUR BACKLIGHT. For daytime exteriors, having the sun behind your actors or subjects is crucial. Watch any large scale feature film that is shot in available light and you’ll notice this is done in nearly every exterior day shot, and for good reason. One of the ugliest looks you can get when shooting with natural light is to have your actors faces blown out with harsh sunlight beating down on them, creating nasty shadows and unflattering images all around. By positioning your actors in a way that places the sun to be behind them to hit the back of their heads, you are essentially doing two things. First off, you’re protecting their face from taking in all of the sunlight which will not only make them look bad, but also cause them to squint. And secondly, with the sun behind them, they will naturally have a backlight that will separate them from the background and create a nice rim around their heads, with nice even lighting on their face.
SHOOT DURING BLUE HOUR AND MAGIC HOUR. Blue hour is the short window of time after the sun goes down (or before it comes up) where the sky is still colorful, but the sun isn’t visible. And magic hour (golden hour) of course, is the hour leading up to sunset or just after sunrise. Both of these times of day are ideal for shooting as the natural quality of light outside at that time of day just can’t be beat. The trick is to utilize these two times of day for different purposes. For example, blue hour is ideal when you need to shoot a short night time scene, but don’t have any lights. There is enough ambient light in the sky to provide definition on your actors while at the same time leaving the environment quite dark, giving the feeling of night time. Car headlights, houses with lights on and other artificial sources in the background will be completely visible during blue hour, helping you to sell that it is night time. Magic hour is really great for scenes that you would normally shoot in the day time (they don’t need to be sunset shots). It will simply make your life easier by providing a very soft and forgiving, warm natural light that will make your scene glow and feel somewhat, well, magical.
CHOOSE THE RIGHT LOCATIONS. This also may sound obvious, but time and time again indie film makers will make the mistake of getting lazy when shooting with natural light. Not having lights doesn’t mean you can just shoot anywhere and slack off in other areas of production. You need to spend a good amount of time picking locations that will work with available light. For example, if you’re shooting an interior of a bedroom scene in the middle of the day, you need to make sure that room has enough light coming in. Is there a window in the room? A skylight? Is there a tree outside that will block the light after a certain time? All of these little questions are critical to ensure that the locations you are choosing will work. It is also important that you do camera tests at these locations. You may have a parking garage that you want to shoot in. But the type of lighting they are using may cause strobing with your camera, or maybe it is just too flat. Choose locations that will lend themselves well to shooting without lights.
USE PRACTICALS. Much of this reading has focused on exteriors, or lighting interiors with daylight, but what about interiors at night? Practicals (lights that are visible in the shot) are your friend here. You may want to use something as simple as a lamp, positioned strategically next to your actor to give them a key light. Or in another scenario, you may have a character sitting in the driveway while another is inside watching TV – in this case you can likely use the car headlights to shoot light through the window. Or it may be as simple as using a dimmer switch when shooting inside a house. This can do a lot as you may want to dim just the background lighting and leave more lights on in the main area as fill for your subject. Using dimmers really helps to control lighting with ease. Candles can also create a mysterious or romantic feel in a scene, or make it feel emotionally "dark".
Shooting with natural light can be a very liberating way to approach the craft of film making. When done well, you can get results that in some scenarios may far exceed what you could have done with traditional lighting. With that said though, you will only get these results if you plan properly, choose the right tools and do your research when it comes to locations and day light. It’s also important that if you choose to use natural light there is a reason to do so, other than the fact that you may think it is easier to work with (which is not the case). If your story calls for a very organic, natural look than using available light can be one of the best choices you’ll make as far as the aesthetics of your production. However if you’re shooting an action film that may not benefit as well from this technique than don’t simply use it because you can. Make the right choice for your project and if it is to use available light, than take the necessary steps to make it look beautiful.
Lynda:
LINK GOES HERE :)
Project 1: Bounces
- Draw a lighting diagram for lighting your subject portrait style using only natural light (lights in a room/sunlight) and bounces/reflectors
- Use any room on campus to create your setup (i.e. near the library windows, in a bathroom, etc.). Light your subject and take a photo through the camera of the subject for the lighting results, and take photos with your phone of the overall setup from a wide angle
- Upload all photos to your portfolio
Project 2: Natural Light
- Find a location that provides great natural lighting. Bring a subject and film them walking, standing, looking at the camera, you name it.
- Use bounces and reflectors to enhance the lighting in the atmosphere. Do a before/after comparison with the footage. Create a video showing the before/after with use of bounces and reflectors in natural light setting. Upload to Vimeo.
- Upload video to portfolio.
Reflection:
- What questions should they answer?
DAY 5: CRITIQUE AND REFLECTION
Get together with other people who are in the Cinema Studio class for a class-wide "Critique and Reflection" period. Each week on Fridays, your time will be reserved for critique, reflection, vocabulary quiz, and prep for next week's projects.
With each completed week, students shall complete a reflection of the project (your project based reflection questions, all due on Friday of that week) and present their work to the class for a group critique session. Critique sessions will be held every Friday. Critique and Reflection will help students not only understand their own work better, but also their peer’s. Seeing other student’s work in progress or as a finished product will help students understand ways that they could better their own work, find other students with similar styles to work with, find students who could assist you in getting better at one particular area of study, or seeing where you yourself would be able to help teach another student about a particular aspect of filmmaking.
HOW TO CRITIQUE: THE CRITIQUE SANDWICH
Positive Feedback (The Top Bun)
- Start off with a specific positive comment about the piece being critiqued. People won't listen to you if you immediately start off with negative comments.
- Example: "I really liked the dramatic shadows you created with the lighting on his/her face. It created a dark and mysterious feel for the character."
Constructive Criticism (The Meat)
- Next, provide a comment of constructive criticism about an aspect of the film. Whenever you provide constructive criticism, remember to always provide a "solution" to the problem you are addressing, meaning, don't just say "this is bad", but say "this wasn't great, this is a possible way to fix it."
- Example: "I felt like the red lighting was a bit to hard on the characters face. Perhaps next time it could be shot with some added diffusion to create a softer light, but still retain the scary/angry feel you were going for with the color?"
Pat On The Back (The Bottom Bun)
- Wrap it up on a good note: "nice job overall" or "I really enjoyed the entire concept of this film" will go a long way with making sure your criticism sticks and they will listen to you, instead of ignoring it.
- Example: "Overall, I LOVED the piece. The emotions you conveyed through the dramatic lighting really heightened the reality you were creating with the film."
weekly vocabulary review and quiz
Reflector
Bounce
Natural Light
Practicals
Blue Hour
Magic Hour